Kamis, 01 Desember 2005

Book Review : Linux Debugging and Performance Tuning (Tips and Techniques)

Recently, I got hold of a book named Linux Debugging and Performance Tuning (Tips and Techniques) by Steve Best. The book positions itself as a programmers guide to debugging and ways of increasing the performance of the programs that you write. The book explores the various tools that a programmer can access to iron out the bugs that crop up in the programs that he writes.

The author starts the narration with a chapter on profiling. Profiling is the art of seeking the time taken by a program or a part there of on execution. A wide variety of tools are covered in this chapter which the programmer can use for the purpose. For instance, on reading this chapter, I came to know how you can use the ubiquitous 'date' utility for profiling your programs.

The next chapter dwells on code coverage analysis - which is the process of finding and targeting dead or unexercised code.

There is a special chapter on the versatile GNU debugger (gdb) which should be included in the tool box of any serious Linux programmer. In fact the author with the aid of example code hand holds the reader on steps to be taken to debug a program. A special section of the chapter also lists helpful hints for debugging an application more quickly.

If you are a programmer, then I need not tell you the importance of keeping the memory footprint of your program to a minimum. You also have the unenviable job of hunting down and doing away with the memory leaks hogging your program. The fourth chapter of this book deals with ways to curb memory leaks by using various free memory leak detection programs like MEMWATCH, YAMD, Electric Fence and Valgrind.

The fifth chapter explores the /proc filesystem. Any Linux user will know that the /proc filesystem is a virtual filesystem which resides in the memory and among other things it provides an easy view of the kernel resources and components. This chapter of the book deals with the various tools a user can use to view the system resources like CPU load, memory and so on. The tools covered include but is not limited to vmstat, diskstats,iostats and mpstat.

The next chapter deals with the various system tools that a programmer or system administrator can use to find which component of the system is having a problem. The author also covers the network debugging tools in this chapter.

Chapter seven deals with the subject of system error messages. As you know an OS generates a lot of messages which aid the user/programmer in getting a fair idea of what went wrong and where. This chapter pursues the analysis of a Oops message to find the failing line of code.

If you are a regular visitor to this blog, then you might have read my previous posts on using logging in Linux. Chapter 8 covers this and much more and explains it from a programmers point of view.

Any programmer / system administrator will know the importance of tracing. By tracing, you are able to collect system data in real time (that is when the process is running). A trace can be used to isolate and understand system problems and check where in the system you are faced with bottlenecks. Chapter 9 namely "Linux Trace Toolkit" of this book looks at just that.

As I explained earlier, a profiler is a program which aids the programmer to analyse the performance of applications and the kernel there by help him optimise his programs. Where as in the first chapter, the author had covered how one can profile using simple tools like 'date', here (chapter 10) he explores the use of a more complex profiler tool called oprofile.

The next chapter (chapter 11) is my favourite. It gives a very detailed (but easy to understand) description on UML (User Mode Linux). To those in the dark, UML is a complete Linux kernel which has its own scheduler and virtual memory system. UML has gained the fascination of programmers around the world mainly because it helps the programmer test his applications in a complete isolated Linux environment within the parent OS. The author takes the reader right from an introduction to UML, to patching and building a kernel, booting a UML and UML utilities. I really liked the tips section in this chapter which revealed new insights into the working of UML.

Chapter 12 deals with the topic of Dynamic Probes. They help a programmer in acquiring diagnostic information without including special blocks of code in the program. Dynamic probes can also be used as a tracing mechanism for both user and kernel space.

If chapter 3 dealt with GNU debugger (gdb), chapter 13 deals with kernel level debuggers. This chapter covers two kernel level debuggers kgdb and kdb.

The final chapter of this book (chapter 14) deals with the topic of Crash Dump. A crash dump is designed to meet the needs of end users, support personnel and system administrators who need a reliable method of detecting, saving and examining system problems. The author covers this topic with elan.

Things I liked about this book
  • Each chapter contains complete (but simple) programs which are used by the author to explain how to use a set of tools to tackle a problem.
  • This book takes a hands-on approach to tackling problems that a programmer or system administrator might face in his work.
  • No complex jargon has been used by the author while explaining the concepts which brings it to the ambit of even fresh programmers.
  • There is something for everybody - from a newbie in Linux programming to an expert programmer.
  • At the end of each chapter, there is a section which lists the web resources where the reader can find more information about the topic covered.
  • The tools covered in this book range from the ubiquitous to the specialist ones. In fact the author throws light on each and every tool covered in this book with the aid of examples.
Meet the Author
This wonderful book has been authored by Steve Best. He works in the Linux Technology Center of IBM in Austin, Texas. He is currently working on Linux storage-related products. Some of the achievements of Steve are as follows:
  • Has led the Journaled File System (JFS) for Linux project.
  • Has worked on Linux-related projects since 1999 and has done extensive work in operating system development focusing on file systems, internationalization, and security.
  • He is the author of numerous magazine articles, many presentations, and the file system chapters in Performance Tuning Linux Servers (Prentice Hall PTR 2005).
Book Specifications
Publisher Name : Prentice Hall (Professional Technical Reference)
ISBN No: 0-13-149247-0
No of Pages : 430
Price : Check at Amazon
Intended Audience : Beginners, Intermediates and Experts alike

Final Word
Believe me, writing a book is a very tough job. Here, Steve has done a wonderful job of compiling this book which can be an asset in the hands of a programmer in Linux. There are even chapters which will help system administrators tackle hard to understand problems they encounter in their work with ease. Reading this book has definitely increased and enriched my knowledge about Linux w.r.t the debugging and optimization techniques.

Rabu, 30 November 2005

Damn! This is one small Linux Distribution

My parents had inculcated some ideals in me when I was growing up and one of them was not to use swear words come what may. Which meant even if a guy was to come and box my snout, I would have said - "That was a despicable thing to do Old Fruit" or something on those lines. But things changed when I downloaded and tried a very cute distribution called DSL - short for Damn Small Linux (oops! I said it).

DSL was created by John Andrews whose main motive was to restrict the size of the resulting distribution but at the same time give a complete GUI environment which included all the softwares that a user might use on a day-to-day basis. He made sure that what ever softwares that are needed were included as long as the size of the resulting distribution could be restricted to just 50 MB. The result is what you see as Damn Small Linux.

Tiny Linux distributions are nothing new. In fact, the tiniest Linux distribution (Tomsrtbt) fits inside a floppy and has been around quite some time. But what is unique about DSL is that it is one of the first distribution which contains a GUI environment contained in its small size and targeted at the ordinary user. Also unlike its other counter parts, it is actively maintained by its creator.

DSL can be downloaded in three formats. They are as follows:
  • dsl-2.0RC2.iso - Which can be downloaded by all who have a fairly modern PC and who intend to use it as a Live distribution.
  • dsl-2.0RC2-syslinux.iso - This ISO image can be used by people who intend to run DSL in older machines.
  • dsl-2.0RC2-embedded.zip - This is the most unique in that it can be run from a windows environment. And is ideal if you want to install DSL in a USB key drive for instance.
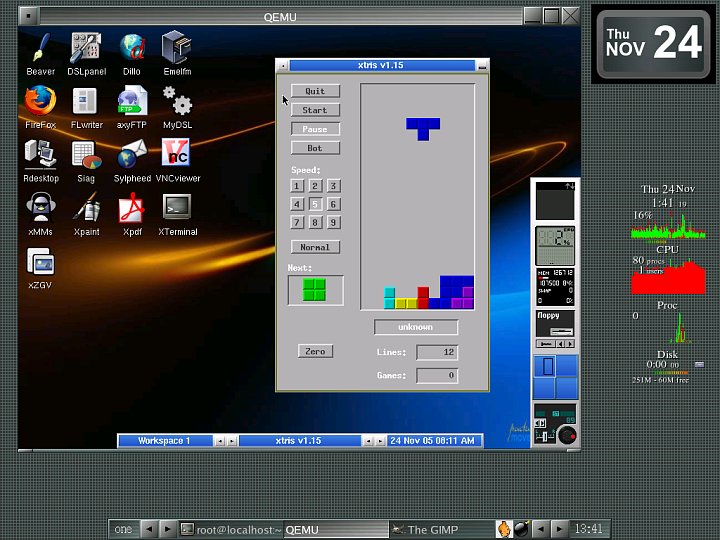
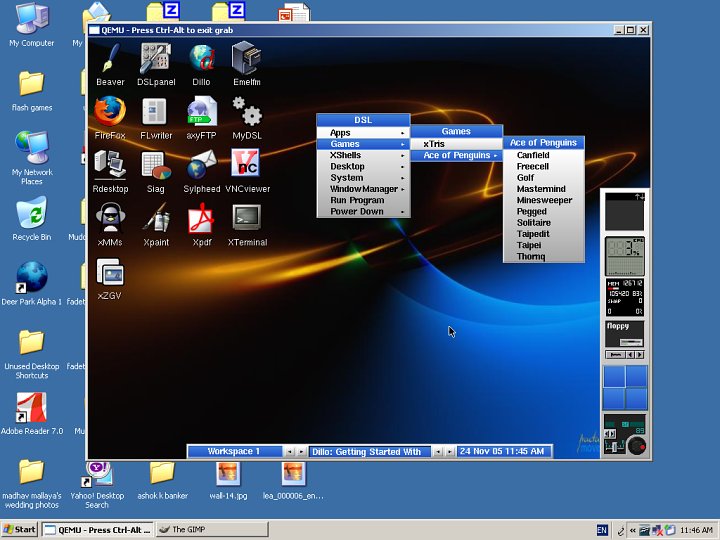
I downloaded the embedded zip file and tried it in both Windows and Linux environment (See screen shots below). DSL uses Linux kernel 2.4.31 and according to the DSL team, they have opted out of using kernel 2.6 because of its bigger size and also their aim to support even very old hardwares which 2.6 doesn't.

Fig: DSL running inside WindowsXP

Fig: DSL running inside Fedora. A game of tetris in progress inside DSL

DSL harnesses the power of QEMU

DSL relies on QEMU to run on top of the host OS (whether it be Windows or Linux). QEMU is an open source cross-platform emulator for Linux hosts. It allows you to emulate a number of hardware architectures (x86, x86-64, and PowerPC are currently known to work, with others, including SPARC and MIPS, in development). QEMU thereby lets you run another operating system on top of your existing OS.

Useful Softwares bundled in DSL
  • Web browser - In fact 3 web browsers - Firefox 1.09, Dillo and Links.
  • Email Client - Sylpheed.
  • Spreadsheet - Siag.
  • Word processor - Believe it or not, DSL comes bundled with a word processor (FLWriter). It even has an MSWord Viewer to view your DOC files.
  • Multimedia - Xmms
  • Graphics suite
  • Games - Excellent collection of card games and a game of tetris.
  • PDF Viewer - XPDF
  • CD Burning Software - DSL has included CDW; a curses based CD burning software.
Window managers in DSL
DSL gives the user a choice of two window managers. By default it runs Fluxbox which is a light weight window manager. The other window manager being JWM. I have been using fluxbox as my window manager in Linux for quite some time. So I felt right at home the first time I tried DSL.

Stress given to user friendliness
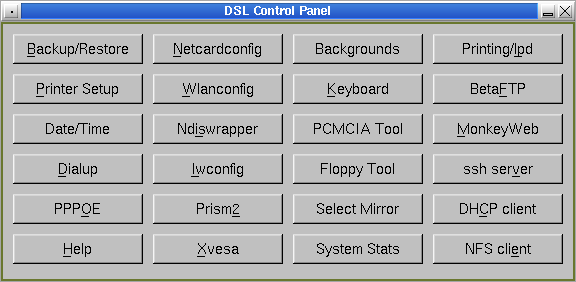
Another aspect of DSL I found fascinating (especially considering its tiny size) was the stress given to usability. All aspects of configuration, which includes wireless network, mouse, keyboard, printer setup and most other services can be achieved via the DSL (Control) Panel.

Fig: DSL Control Panel

There is something for system administrators too.

DSL comes with the following servers:
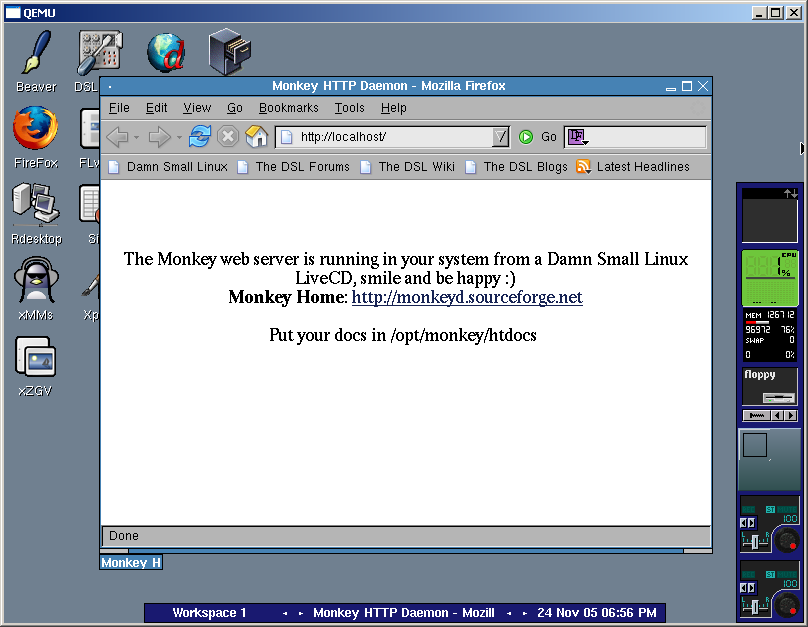
  • Web Server - Monkey Web server
  • SSH Server
  • FTP Server - BetaFTPd
  • NFS Server
Fig: Screenshot of a HTML file hosted in Monkey Webserver in DSL

Uses of Damn Small Linux

By this time you might be wondering what is the use of this Damn thing (Pun intended). Right? Some of the uses I figured out for DSL are listed below:
  1. Suppose you are visiting a Cyber Cafe for checking your mail and you are concerned about your privacy. By using Damn Small Linux on a USB key drive, you can circumvent the problem because all the cookies, browsing history and passwords you use are stored in your USB key and not in the host computer.
  2. Your files will not be affected by viruses and worms that are residing in the host computer because you are using Linux on top of the resident OS.
  3. For a person more comfortable in working in Linux, DSL is god send because now he can work independent of the environment of the host computer.
  4. Where ever you may go, you can take a working OS with you and is saved from being at the mercy of the applications residing in the computers you are using.
If you put your mind to it, I am sure you can come up with even more uses for this cute little distro.

Damn! damn! damn! I can't stop taking the 'damn' word since I tried DSL (Sorry dad). This distribution truly showcases the power of the GPL which made the DSL project a reality. I shudder to think of what would have been the case if there was no GNU movement.
Update: Mr John Andrews the creator of DSL has clarified a point by posting a comment on this post which I have included here. I quote -
I just wanted to mention that DSL would not be half as fantastic as it is today without the tireless contributions from Robert Shingledecker. Everyone who enjoys DSL owes him thanks.

Selasa, 29 November 2005

Time saving Linux desktop tips

If you enjoy reading the views of others regarding a particular feature , or like to know tips and tricks which will help you to be more productive in Linux, then you should read "Time saving Linux desktop tips" - a post at ask.slashdot.org.

But in true slashdot tradition, it has an abundance of troll posts. So make sure you have ample time on your hands to sift through and seperate the chaff from the wheat (so to say).

Senin, 28 November 2005

Secure Linux/UNIX access with PuTTY and OpenSSH

In earlier posts namely SSH - Secure Shell and How to setup SSH Keys and Why?, I had explained how you can securely connect to a remote machine using SSH as well as enhance the security by using digital signatures instead of mere passwords.

Now Steve Friedl has written a paper called - Secure Linux/Unix access with Putty and OpenSSH which dwells on the topic of connecting between remote Windows and Linux machines using SSH.
Putty is a tiny ssh,telnet and secure FTP client for the windows platform and is known for its versatility and user friendliness. Steve takes the reader through the whole configuration process with aid of nice illustrations.

With more and more people logging on to the net, security has become an important factor even for home users. And transmitting your data using SSH and encryption is considered a safe habit by many.

Minggu, 27 November 2005

JS/UIX - A Unix shell which runs in a web browser

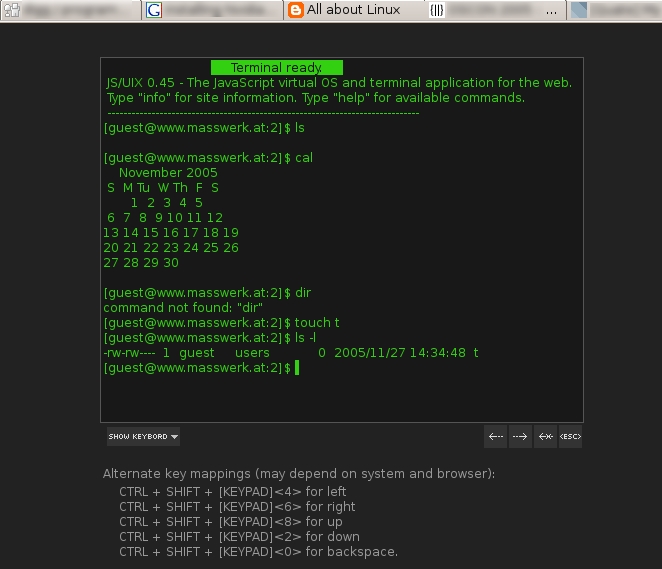
JS/UIX is a unix shell which can be run inside a web browser. The uniqueness of this project is that the whole shell has been coded entirely in javascript. It supports around 55 commands and even has a game called 'invaders' to amuse oneself during free time.

Fig: Preview of Unix shell running inside the web browser

Even though JS/UIX comes nowhere near a standard unix/linux shell, it helps a person to try out many shell commands when he has no immediate access to a linux or unix machine. Any web browser greater than Netscape 4+ and MS IE 4+ can run the shell without any problems provided you have enabled javascript.

Sabtu, 26 November 2005

10 Things that make Ubuntu a Neophyte's Distribution

Ubuntu is fast on its way to becoming a peoples OS. I have always wondered what is it that makes people embrace Ubuntu over other Linux distributions. After some pondering, it struck me that the USP (Unique Selling Point) of Ubuntu is its user friendliness. Ubuntu is a distribution targeted at the non-techie crowd - those that want to get their job done and not spend time tinkering with the OS. And consequently, the developers at Ubuntu have bundled simple easy to use GUI front end tools to achieve common system administration tasks. Here I have put together 10 things in Ubuntu that make a new user's life that much simple. I used Ubuntu 5.10 to aid my observation.

Network Tools
This is a graphical front end for all the frequently used network tools like ping, traceroute, netstat, finger and whois. Accessed through 'Applications -> System Tools -> Network Tools' , It is designed with the new user in mind and is quite intuitive to use. In fact all the user has to do is type in the IP address of the machine to ping to and press a button and lo, it displays the result in a user friendly format.

Fig: Network Tools GUI

Ubuntu Device Database Submission Tool
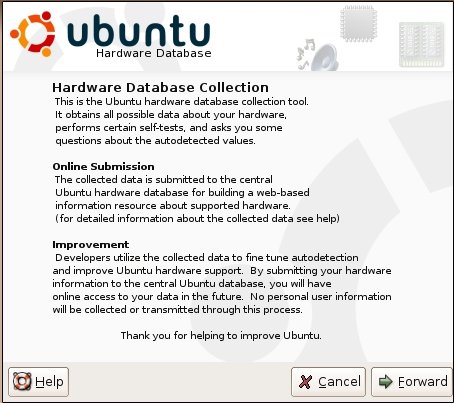
This is another tool I found unique to Ubuntu. Consider this scenario, you have a machine whose sound card is not detected properly by Ubuntu. By using this tool, you can send a report to the developers of Ubuntu giving details of your sound card (like the chipset used) and be assured that in the next release, they will have support for your hardware. But if everything is working properly, then also this tool is useful because it will automatically detect all the hardware and send a report back to the developers for storing in their database. Access it through 'Applications -> System Tools -> Ubuntu Device Database'.

Fig: Device Database Submission Tool

GParted - The Partitioning tool in Ubuntu
This is a GUI based partitioning tool that comes bundled in Ubuntu. Using gparted, you can easily create, resize and format partitions on your hard disk. And if you want to find the make of your hard disk, it is just a mouse click away in this utility (Applications -> System Tools -> GParted). Just click Menu 'View --> Hard disk Information' to see the size, the model, the device name (eg: /dev/hda) of your hard disk and number of heads, sectors and cylinders on it. By clicking the menu 'Partition --> Convert to', you can create a wide variety of file systems including NTFS on your partition. GParted is the closest you can get to user friendliness as far as a partitioning tool is concerned.

Fig: GParted - the partitioning software

Add Applications
One grouse that all users switching to Linux had was the difficulty in installing and uninstalling applications when compared to windows. This is done away with the Add Applications tool in Ubuntu. It is a Gnome front end to the popular command line tool Apt-Get. You want to know how easy it is in installing applications ? I had downloaded a Kubuntu CD image and had burned it on to a CD. To merge it in Ubuntu, all I had to do was click the Menu 'Settings --> Repositories' and press the "Add CD" button. Then I could install all the KDE packages from the CD with the click of a button. And if you are online, you don't even have to add the CD to your repository list. The program will automatically pull the necessary packages from the internet and install it on your machine resolving all dependencies.

Fig: Add/Remove applications Dialog

Device Manager
This is the HAL Device manager. HAL stands for Hardware Abstraction Layer. This utility accessed through 'System --> Administration --> Device Manager', gives you more information about the various parts of your PC like the type of processor used, memory, sound card chipset, mouse and the likes. Even though you can get all the data by browsing the /proc directory, neophytes will find it comforting to have these details a few mouse clicks away.

Fig: Device Manager

Services Settings
This is a very intuitive and simple GUI tool which helps a user take control over which services are started at bootup time. In a default installation of Linux, a lot of daemons are started up during bootup which significantly increases the time that the system takes to fully load a desktop. For example, if you are using a stand alone desktop PC, you can do away with services like NFS, PCMCIA (which is needed only in laptops), Cupsd (if you do not have a printer) and so on; which will make your machine more responsive. You can use the service settings GUI to start or stop all the services.

Fig: Services Settings Dialog

Creating Users & Groups
It is a snap in creating users and groups in Ubuntu using the users and groups dialog. You can even control a user's rights like access to certain devices like cdroms, floppy, internet connection, modem and so on from the User Privileges tab of the User Account Editor. Do you suspect your son is viewing X rated movie CDs on your computer when you are not around ? You just uncheck the option "Use CD-ROM devices" in the user privileges of your son's account and you can rest assured.

Fig: Set per user rights to devices

Troubleshooting is just a chat room away
Ubuntu comes with XChat IRC client installed by default. When I faced a doubt regarding a particular feature, I fired up the chat client (XChat) and logged into the Ubuntu IRC server (Which is the first server in the servers list). And within a few minutes, I was able to get my doubts clarified from the #ubuntu chat room.

Network Setting dialog
This GUI helps users to easily setup the ethernet and modem connections. You can activate and deactivate the devices with the click of a button. Further more, this front end lets you set the hostname and domain name for your computer.

Fig: Setup your ethernet card and modem

Manage your sessions with ease
If you select the Sessions tool from 'System --> Preferences --> Sessions', you can enable any program to start automatically when you login to your account. For example, I use Tomboy - a popular note taking application to jot down notes. When not in use, it resides in my system tray. I have set this application to start each time I log in to my account by including it in the sessions box.

Fig: Managing your sessions

By bringing out such nice GUI frontends to ease the user experience, Ubuntu is doing its mite in promulgating the Linux OS aiding its wider acceptance among the masses. After having used it for close to a month, I can say with certainty that Ubuntu is a distribution which is a worthy entry into the Linux desktop market.

Jumat, 25 November 2005

How to Repair a Corrupt MBR and boot into Linux

There are times when you inadvertently overwrite your Master Boot Record. The end result being that you are unable to boot into Linux. This is especially true when you are dual booting between windows and Linux OSes. Once when I was working in Windows XP, I accidentally clicked the hibernate button instead of shutdown. And windows somehow overwrote my MBR which housed the GRUB boot loader. At such times, it pays to have this cool tip at hand.

This is what you do to restore the GRUB boot loader when faced with the above problem. First you need a Linux distribution CD. If you are using Fedora (RedHat) then the first CD is sufficient. But you may also use any of the live CDs like Knoppix, Ubuntu Live CD and so on.

With Fedora CD
Boot your computer with the first CD of Fedora in your CD drive (You have to enable your PC to boot from the cdrom, which you can set in the BIOS settings). At the installation boot prompt that you get, enter the following command:
boot: linux rescue
... and press Enter. The installer will ask you a few questions like the language you would like to use, the type of keyboard etc. Then, if you have linux previously installed on your machine, the Fedora installer will automatically detect it and mount it in the /mnt/sysimage directory. Once the linux partition is mounted, you are dropped into the command shell prompt. The next step is to make your newly mounted directory the root (or parent) directory. This you do by running the chroot command as follows:
# chroot /mnt/sysimage
# _
Now you are in the shell with respect to the parent directory which is the linux partition on your harddisk.

From here, the steps needed depends on which bootloader you are using. You have to have a fair idea what is the device node of your harddisk partition housing your MBR. In most cases, it is /dev/hda if you have an IDE harddisk. But if you have a SCSI harddisk, it will be /dev/sda.

Restoring GRUB
Execute the following command :
# grub-install /dev/hda
... to install GRUB boot loader on to your MBR. And then type exit to reboot the machine. Now your GRUB boot loader is fixed.

Restoring LILO
LILO stands for LInux LOader which was the boot loader used before GRUB was developed. It is fairly cryptic and is the default bootloader prior to and in RedHat 7.0 .
Here you just type the command :
# /sbin/lilo
... to install the bootloader on to the MBR.

If you don't have a Fedora CD, then you need not despair. You can also repair the boot loader using one of the numerous live CDs available.

Using Knoppix CD to repair the boot loader
Here you have to boot into knoppix (either GUI mode or text mode). Once you are logged in, fire up a terminal (in GUI mode) and type the following commands:
$ su -
# fdisk -l
This will list your hard disk partition information. From the listing, you can know in which partition you have linux installed. Now you have to mount the partition which contains the linux filesystem. For the sake of this discussion, let us assume it is /dev/hda3 .
# mount -t ext3 -o rw /dev/hda3 /mnt
#_
Now your linux partition is mounted at /mnt . Next you have to use the chroot command as follows:
# chroot /mnt
#_
The rest of the steps are the same as listed above for Restoring GRUB and LILO boot loaders.

Update (August 01 2007) : Many have said when they run the grub-install command after following the above steps, they get an error saying that /dev/hda is missing. The most probable reason is that when you chroot to the mount location, it does not have a copy of the device nodes on your machine. Here is a solution for that. If you have installed Linux with /boot, /usr and / in different partitions then the above method may not get the desired results and running the grub-install /dev/hda command after running chroot might give the error that there is no /dev/hda. This is because you have mounted only one of the partitions which houses '/' . And the error tells you that it cannot find the device nodes. In this scenario you can do the following :

Lets say I have Linux installed with / in /dev/hda2, /boot in /dev/hda1 with an ext3 filesystem. I boot using a Live CD as described above and then mount the partitions as follows :
# mount  -t ext3  /dev/hda2  /mnt

# mount -t ext3 /dev/hda1 /mnt/boot
Remember that you are mounting the boot partition into the boot directory inside /mnt. Now mount the proc filesystem of your liveCD as follows (This is really an optional step):
# mount -t proc  none  /mnt/proc
Finally bind the device nodes build by your liveCD to the /mnt/dev location as follows :
# mount  -o bind /dev  /mnt/dev
Now you can chroot to the /mnt location and run the grub-install command as described above.
# chroot /mnt
# grub-install /dev/hda
Please note: This updated method is applicable only if you have a Linux installation spread across multiple partitions. If you have installed Linux in a single partition, the first and second step works flawlessly. At least it works for me.

Also Read :
Dual Booting Windows XP/2000 and Red Hat Fedora Core 2