Tampilkan postingan dengan label backup. Tampilkan semua postingan

Rabu, 01 April 2009

Install Linux in your Dropbox account using VirtualBox

DropboxDropbox is a very popular online storage service which provides 2GB of free space to store all your files, and selectively share them with the public. What is really nice about Dropbox is that it provides tools which integrates with Windows, Linux and Mac OSX and makes uploading and downloading files to and from your Dropbox, and act as a conduit for backing up all your important files - a seamless affair.

LinuxHaxor has a nice writeup on how to use your free 2GB Dropbox account to install your choice of Linux distribution via Sun's VirtualBox. Make sure the Linux distribution you choose is less than 2GB in size when installed as you will be limited by the 2GB space on Dropbox.

The writeup walks one through the installation of Damn Small Linux on Dropbox using VirtualBox. Read the article.

Minggu, 05 November 2006

AptonCD - Create a backup of all the packages you have installed using apt-get

Consider this scenario... You are interested in installing GNU/Linux on your machine. Assuming you already have the latest version burned on to a CD, it is a simple affair of popping the CD into your CD drive and starting the instalation. But once the installation is done and finished, you will most certainly want to install additional software apart from the ones bundled with the CD. And if you are using a Debian based Linux distribution such as Ubuntu, you will be using the apt-get method. Over a period of time you would have installed a number of additional software including any packages satisfying their dependencies as well as upgraded some of the software to the most recent version.

The problem occurs when you decide to re-install Linux on your machine. You are forced to start all over again, downloading additional software using apt-get. Personally, I have re-installed Debian or a Debian based Linux distribution umpteen times on my machine. And each time I have wished there was a simple way of backing up the packages which I have previously downloaded and installed via apt-get.

A good samaritan has pointed out to a unique project named AptonCD which allows one to create a CD image (ISO) of all the packages downloaded via apt-get or even the packages in a given repository.

On Ubuntu for instance, you can install it using the command:
# sudo apt-get install aptoncd
Once it is installed, you will find a Gnome menu entry at the location System -> Administration -> AptonCD. Clicking on it opens a GUI which will aid in the creation of an ISO image of all the packages stored in the /var/cache/apt/archives directory and any other files which are needed. You can also run aptoncd from the command line to start the AptonCD program.

So how do you use the program ?

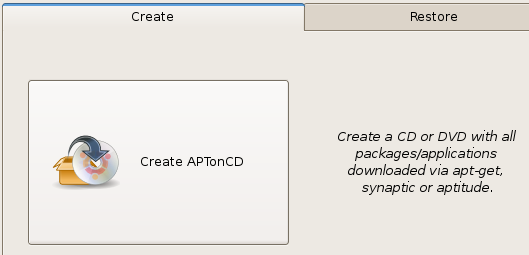
It is simple really, the GUI has two tabs namely Create and Restore. The Create tab has a single button which when clicked copies all the necessary packages from the /var/cache/ directory and displays it in a pop up dialog. Here you get to decide if you need to add any additional packages stored in an alternate location or remove some of the already selected packages. There is also an option to set the target media as a CD or DVD and the location where you want to save the resultant image.

Fig: The create tab has just a single button

Fig: Selectively include the packages using this dialog

Once the choices are made, the program creates the necessary CD/DVD image and saves it in the location you had chosen. Now you can either store it in a different location or burn it to a CD/DVD.

Fig: Restore tab allows you to restore from backup

The Restore tab of the AptonCD GUI contain three buttons each catering to a specific purpose. This tab allows you to -
  • Restore all packages available from an AptonCD media (read it as CD or DVD) on to the computer.
  • Restore packages from an AptonCD ISO image previously generated and stored locally.
  • Add a CD/DVD created as a repository for apt-get, aptitude or synaptic. Which means the program adds the necessary lines of code required in the /etc/apt/sources.list file which will enable you to use apt-get or any similar program to install the software on the CD.
I found this program really convenient to use not only when I re-install Ubuntu but also when I want to install the same set of programs on a different machine.

One thing it lacks is a way to automatically download the packages from a remote repository and create a CD/DVD image. But then this software is still in its beta stage and hopefully we can see more features built into it in coming years.

The AptonCD project is the brain child of Rafael who's first language (I believe) is Portuguese. Not surprisingly, I found the help files bundled with the project to require a bit more work as in the present form, they are just place holders for the required documentation. But he has done a remarkable job on the software itself and in its current form, it works flawlessly.

Minggu, 19 Maret 2006

Mondo Rescue - An easy to use disaster recovery software for GNU/Linux

Studies show that one of the principal point of hardware failures in a computer pertains to the hard disk. This is especially true if you are in the habit of running the machine for lengthy durations in between reboots to the order of days and months, if not years. Usually mission critical servers are run in such a manner. But now a days, with the advent of always-on internet access, more and more home users find it convenient to keep their machines turned on for days on end even when they are not in use. In such a scenario, it is only a matter of time before the user is faced with a hard disk failure.

This is where the disaster recovery software gain prominence. If you are in the habit of taking a snap shot of your computer file-system on a regular basis, in the advent of a hard disk failure, you can not only save all your data but also get your system up and running in very short time .

There are quite a few ways of getting a snapshot of a live system in Linux. Many of them requiring varying degrees of expertise. One such software is Mondo Rescue which simplifies the whole act of backup and restore of the filesystem in Linux. More specifically, Mondo rescue is a disaster recovery software developed by Hugo Rabson for GNU/Linux which allows one to effortlessly backup and interactively restore filesystems mounted in Linux which includes even NTFS partitions. And what is more interesting is that, you are provided the choice of backing up to a variety of media like the CD-R, CD-RW, DVD, NFS share, tape and even to another partition of the hard disk.
Fig: Mondo in action

To start using this software, you have to first download and install it as it is not bundled by default on Linux distributions. And for Debian based systems, it is as simple as :
# apt-get install mondo mondo-doc
You will need mono-doc package because it contains the detailed documentation in HTML format. Once the software is installed on the system, one can start to create a snapshot by typing the following command as root :
# mondoarchive
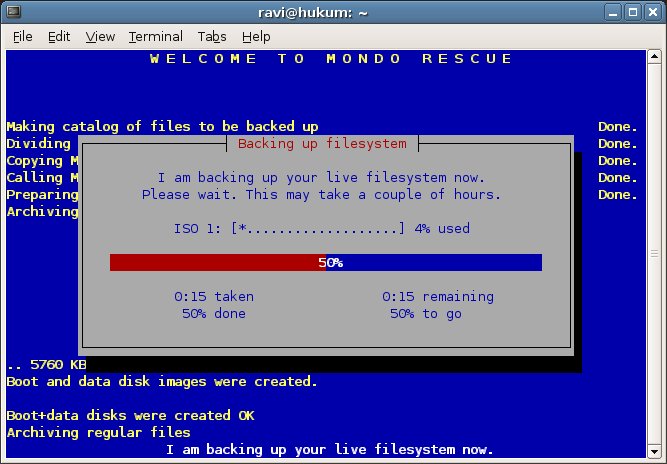
This command opens up a curses based GUI which walks you through the process of creating the backup of your Linux system to the desired media. To try it out, I decided to clone my partition containing Linux OS in which I had installed some additional software from the net. I gave it directions to backup everything except /var/log, /proc and /home directories and to my surprise, it neatly created a backup in the form of a series of ISO files ready for burning to the CD. In fact, I could have selected the option of CD/ROM in which case, it would have also automatically burned the image to the CD using cdrecord.
Fig: Backing up files in progress

Backing up is well and good. But what about restoring the data back to the hard disk?
Mondo actually works in conformation with another software or rather a script called Mindi. This script is responsible for creating a bootable CD or floppy image (in cases where you want to restore from the NFS share) which contains the Linux kernel, modules, tools (fdisk, cat, mkfs, gzip, less, more ...) and libraries which helps one to do basic system maintenance in Linux.
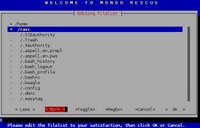
Fig: Restoring files in Mondo
So to restore my Linux system to the original state prior to taking the backup, all I had to do was boot the computer using the first backup CD and I would be put into a bash prompt. At the bash prompt, I type the following command:
# interactive
... and the software asks a series of questions which require a yes or no answer and then start the process of restoring the backup. I had the choice of restoring the complete filesystem, a subset of directories or even individual files which made this software very flexible to use.

Also if you have a need of restoring a part of the files from the backup CD while inside the Linux environment, you may use the command :
# mondorestore
... and follow the directions which will also have the desired effect.

Mondo can also be used on the commandline
This utility can also be perfectly used on the command line which will gladden the hearts of people who thrive working from within the shell.

What I found really interesting about the command line method is the combination of options used which made using this utility really intuitive. For instance, if I want to backup the filesystem to a CD, I would use the switch -Oc and for backing up to a tape drive, it is -Ot, to a remote NFS share -On and so on. But these are not the only switches available. I could exclude certain directories from being included in the backup by using the -E switch and include many others by using the -I switch.And if I want a running commentary of what is being done, then I use the verbose -V switch.

For example, instead of using the curses based GUI tool while creating the backup, I could have perfectly passed all the options on the command line as follows :
# mondoarchive -OiV -p mybackup -I / -E "/media/hda1 /var/log /proc"  -d /home/ravi -s 650m 
The above command will create (-Oi) an ISO image containing all the files (-I) in the filesystem except (-E) the files in /media/hda1, /var/log and /proc and save the resulting ISO image in the /home/ravi (-d) folder naming (-p) the ISO mybackup-[1-20].iso . And each of the resulting ISO will have a maximum size (-s) of 650 MB.

I found this utility really efficient and easy to use for my modest backup needs. Another aspect of this utility is that the ISO image created, when burned to a CD can be used as a fully functional CD-based mini-distribution as well as a recovery CD because, as I mentioned earlier, it contains the Linux kernel, the essential libraries, modules and tools.

Pros and Cons of Mondo Archive
After testing and using it for quite some time now, I find Mondo recovery to be a robust disaster recovery software suitable for the needs of both the home user as well as small to medium businesses. Its curses based GUI interface is rather intutive . This software makes backing up Linux and Windows partitions to removable media quite easy.It's support for backup to CD,CD-RW,DVD,tape, hard disk as well as NFS mounts makes taking snapshots of ones harddisk really flexible. Its support for both LVM and RAID as well as boot managers GRUB and LILO brings it at par with its propritery counterparts. One can even create multi-CD backups using this software albeit with an upper limit of 20 CDs per set.

Of course, as with all software, this too has its own shortcomings such as its inability to handle system and hidden attributes when archiving Dos/Windows files. Also some of the features like using regular expression to select a group of files to be backed up is yet to be implemented though there is a button for this made available in the GUI mode.

Having said that, I think these are mere wrinkles when compared to the usability and the sheer number of features of this GPLed piece of software which makes it a powerful tool for taking periodic snapshots of the filesystems.

Sabtu, 24 September 2005

Backup your data with 'rsync'

Uses of rsync
  • Copying local files.
  • Copying from the local machine to a remote machine and vice versa using a remote shell program as the transport (such as ssh or rsh).
  • Copying from a remote rsync server to the local machine and vice versa.
  • Listing files on a remote machine. This is done the same way as rsync transfers except that you leave off the local destination.
For example, if I want to take a backup of my files in the remote machine called remote_mc, then I will do the following:
$ rsync -avze ssh ravi@remote_mc:/home/ravi/ . 
... where, a sets the archive mode which is a quick way of saying you want recursion and want to preserve almost everything excluding hardlinks which can be included if you specify -H. v is verbose mode, The z option signifies that rsync compresses any data from the files that it sends to the destination machine. This option is useful on slow connections. And e allows you to choose an alternative remote shell program to use for communication between the local and remote copies of rsync. The above command will recursively copy the directory ravi/ from the remote machine to the current directory in my local machine.

Note: If I give ravi@remote_mc:/home/ravi instead of ravi@remote_mc:/home/ravi/ then it will copy all the files and directories from ravi/ directory but will not recreate the ravi directory locally.

The first time I run the above command, it will do a full backup - which might take a while for the copying to complete. But the real beauty of rsync is when I run the same command the next time, when it will check with the source and copy only those parts of files which have been modified after the first backup and will take relatively less time. This is called a differential backup.

You can even sync your backup to mirror the files and directory structure by using the --delete flag.

$ rsync -avz --delete -e ssh ravi@remote_mc:/home/ravi/ .

The --delete flag will delete any files on the receiving side which are not there on the sending side. This flag should be used with care and is advisable to first run the command with the dry run option (-n) to see what files would be deleted to make sure important files aren't listed.

Incremental backups with rsync
You can also create incremental backups with rsync. For example, look at the following command:
$ rsync -avz --backup --backup-dir=/backup --suffix=`date +"%F"`  -e ssh ravi@remote_mc:/home/ravi/ . 
Here, I have denoted that I want a backup with the --backup flag, specified that the backup should be stored in the /backup directory with the --backup-dir flag and the backed-up files should have the current date appended to their names automatically - which I have accomplished using the --suffix flag.

This post dwells briefly on the various uses of rsync. For more details you may read the rsync man page.
And yes, I found this very informative article called Easy Automated Snapshot-Style Backups with Linux and Rsync which explains in detail the numerous ways of taking a backup of your data using rsync and the most efficient of them all.

Also check out ...
Other backup scenarios in GNU/Linux

Jumat, 20 Mei 2005

Creating Tape ARchives using cpio

Cpio is a tool for creating and extracting archives, or copying files from one place to another. It handles a number of cpio formats as well as reading and writing tar files. The GNU cpio performs three primary functions. Copying files to an archive, Extracting files from an archive, and passing files to another directory tree.
Suppose you want to take a tar backup of all your configuration files. This can be achieved easily by the following set of commands:
$ find /etc -iname \*.conf | cpio -o --format=tar > test.tar
or you could substitute the -H switch for --format in the above command for the same effect.
$ find /etc -iname \*.conf | cpio -o -H tar > test.tar
Same command without the redirection ">"
$ find /etc -iname \*.conf  | cpio -o --format=tar -F test.tar
OR
$ find /etc -iname \*.conf | cpio -o -H tar -F test.tar
You can append data to an already existing tar file using the --append switch. For that first create a tar file as follows:
$ find ../dir1 | cpio -o --format=tar -F test.tar
Now append some data from 'dir2' to the newly created 'test.tar' file using the --append switch.
$ find ../dir2 | cpio -o --format=tar --append -F test.tar
List contents of the tar file
$ cpio -it  < test.tar
OR
$ cpio -it -F test.tar
Extract the contents from the tar file
You use the -i switch for the purpose.
$ cpio -i -F test.tar
The advantage of 'cpio' over 'tar' is that it can take input from the 'find' command.
Suppose you want to copy all (or a subset of) the files in your directory to another directory. This can be easily achieved by using the combination of find and cpio as follows:
$ find . -print0 -depth | cpio --null -pvd new-dir
The interesting thing to note is the -print0 and the --null switches which act together to send filenames between find and cpio, even if special characters are embedded in the filenames. The -p switch tells cpio to pass the files it finds to the directory 'new-dir'.