Tampilkan postingan dengan label web servers. Tampilkan semua postingan

Rabu, 16 September 2009

Linux servers can now be infected - Or can they ?

Linux gurus have always vouched on the safety and security of Linux - especially Linux running as servers. However, now after a developer named Denis Sinegubko has published his findings, they may just have to ponder over their words.

According to Denis, the Linux servers can be infected to be used in a botnet used to distribute malware.  The modus operandi of attack is as follows :
Read more »

Jumat, 16 November 2007

online htaccess editor

If you have ever configured the apache web server, then you will realize the important part played by the .htaccess file. This file is especially used by people who make use of a shared web host provider to host their sites.

Some of the uses of .htaccess file that I can think of are :
  • Redirecting the visitor automatically to the new location of the web page.
  • Providing a 301 redirect [moved permanently] to search engine spiders.
  • Setting up a username and password to access a part of or whole of your website.
  • Restricting access to your website for all visitors originating from a particular IP address or IP range.

... and so on and so forth.

I have always found editing the .htaccess file as bit of a black art. Mainly because mastering the regular expressions involved to accomplish tasks takes a bit of practice and some hits and misses before you get the desired results.

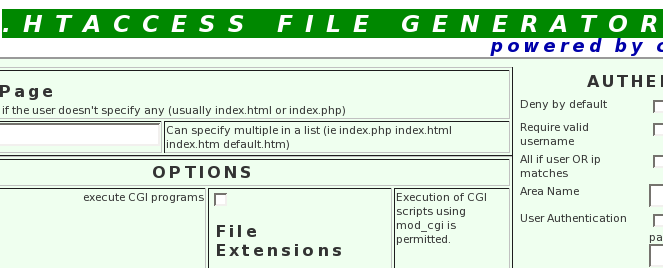
Online htaccess editorFig: The online .htaccess editor

Now here is a very nice find. An online .htaccess editor which will hand hold you in creating your own custom made .htaccess file. All you have to do is click on your desired options such as whether to allow or deny access to all files, basic authentication, the redirect directives and so on.

Senin, 27 Agustus 2007

Set up an Apache web server cluster in 5 easy steps

A server cluster is a group of independent servers that are managed as a single system for higher availability, easier manageability, and greater scalability.

In a Web server environment, server clusters can be defined in two basic ways:

Active/Active
  • There are multiple independent, redundant servers
  • The load is distributed through round-robin DNS
  • The load is balanced by a load-balancing solution
Active/Passive
  • Multiple servers are configured to provide a service
  • Only a single server provides the service at any given time
  • Other servers serve as hot-spares in case of a server (service) problem or a site hosted on the servers suddenly start getting load spikes such as when being slashdotted.
Now a days, many shared web hosting providers are turning to a web server cluster solution over managing individual web servers on independent machines. Clustering is said to provide some respite to the performance issues.

Eli M. Dow and Frank LeFevre, both, Software Engineers at IBM have written this insightful albeit rather technical article which explains how to setup an Apache web server cluster in 5 easy steps.

From the article ...
Spreading a workload across multiple processors, coupled with various software recovery techniques, provides a highly available environment and enhances overall RAS (Reliability, Availability, and Serviceability) of the environment. Benefits include faster recovery from unplanned outages, as well as minimal effects of planned outages on the end user.

To get the most out of this article, you should be familiar with Linux and basic networking, and you should have Apache servers already configured. Our examples are based on standard SUSE Linux Enterprise Server 10 (SLES10) installations, but savvy users of other distributions should be able to adapt the methods shown here.
Jumat, 06 Oktober 2006

.htaccess Tips and Tricks

Apache is one of the most popular web server which is stable and which scales very well. This web server which has been released under a free licence has the honor of powering many of the very high traffic sites, not to speak of the 100s of 1000s of ordinary websites dotting the net landscape.

Usually, when you host a website on a shared server, you are not provided any rights or access to modify the main configuration file (http.conf or apache2.conf depending on the OS on which the webserver runs) of the apache webserver. So you are severely constrained about changing the parameters of the web server (called server directives) and have to rely exclusively on the systems administrator manning the remote server.

This is where the .htaccess file has its use. By creating this hidden file in the root folder (or any sub folder) of your website, it is possible to set/unset almost all the server directives that can be set in the apache main configuration file. And these changes will take effect only for the root folder in which you created the file and its sub folders. Thus .htaccess file plays an important role in providing fine-grained control to an individual managing a website without giving blanket control of the web server.

For example, you can effectively use .htaccess file to deny access to everyone for certain folders residing withing your website directory. Or you can password protect your directory and allow access only to authorised people. But one of the most powerful and popular trick is to rewrite a particular URL using regular expressions. This can be useful if for instance, you have relocated some of the web content to another location thus changing the path of the file. So instead of giving a visitor an error page, you can write a couple of lines in a .htaccess file which will redirect the user to the new location of the web page.

Today, I came across this two part series (Part I and Part II) titled '.htaccess tips and tricks' which explains many of the tasks one can achieve using the .htaccess file which makes an informative read.

Rabu, 23 Agustus 2006

How to setup a home web server - the Red Hat way

In previous posts I have explained how to set up apache server to serve webpages on ones personal machine. But then I explained how to do it the Debian way. Obviously there are other ways of doing the same thing. For instance, if you put the same query (of setting up apache webserver) to a person running RedHat, the steps he will list out will be some what different from what I had covered. By now you will realise what I am getting to. There is obviously a Red Hat way of doing things and a Debian way of doing things.

In Debian based distributions, the apache webserver uses a modular structure of storing configuration information using different files for each site which makes it less cluttered. Where as in Red Hat, you have a single flat file called httpd.conf in which you add all the configuration details of each site.

Jeff Goldin has written an excellent article which explains the Red Hat way of setting up a home web server which makes a very interesting read. But apart from the minor differences, the article contains lots of information like the type of hardware to select, the partition scheme to use, increasing the level of security of the webserver and so on which I believe are important concepts which could be applied while hosting a web server in other Linux distributions too.

Minggu, 18 Juni 2006

20 ways to secure your Apache configuration

In an earlier post I had explained how to host websites on ones personal machine using apache webserver as well as password protecting the website using .htaccess and .htpasswd files.

But there is much more to apache than these configuration features I described. For instance, there is the mod_rewrite module which is heavily used by most content management systems to provide a easy to remember permanent link to individual web pages and an indepth introduction to mod_rewrite will take up larger part of a big chapter.

Pete Freitag has written a very good article which lists the steps one can take to secure running Apache webserver on ones machine. What I like most about his article is the simple manner in which he explains the various configuration parameters aided with bits of code. A very informative read indeed.

Kamis, 25 Mei 2006

.htaccess File Generator

Apache is one of the most flexible web server around. And one of the features that aids it in being flexible is a hidden file which goes by the name '.htaccess'. This file is used by web site administrators to make configuration changes on a per-directory basis especially when the administrator does not have access to the main configuration file of the apache web server.
You can use this file (.htaccess) to password protect files in a particular directory in your website, give mod-rewrite rules, force HTTP requests to use secure socket layer and so on. In fact, one can write just about any rule that he/she can configure in the main configuration file of the apache webserver.

But if you find writing code to be a hassle, then this webpage will aid in creating a .htaccess file from scratch with the parameters of your choice.

Jumat, 12 Mei 2006

A step-by-step guide to running your own Unix Web Server

What does it take to convert ones computer to work as a web server ? You need a stable and secure network operating system, a web server software, a database which scales well and your choice of scripting language.

The interesting thing is that it is quite easy to convert a computer to work as a web server using only free technologies. We have a plethora of free OSes like Linux, FreeBSD and Open Solaris which are a robust and secure alternative to the proprietary ones, a very popular web server software in Apache and a robust free database in MySQL. I need not tell that PHP is one of the most used dynamic scripting language on the web and is the preferred choice for building most websites. So is that all that is needed to set up a web server? Not quite... You also need to have the expertise in configuring the various parameters of the above mentioned software.

In a previous article, I had explained how to serve webpages from ones machine using Apache web server.

Dave Tufts has written a three part series on setting up ones machine as a web server. He has used FreeBSD as his choice of OS and Apache, MySQL and PHP as the web server, database and scripting language respectively. In the first part of the article, he lists the steps needed to install FreeBSD on ones machine which includes the ideal partitioning scheme for this purpose. In the next part, he takes the readers through installing Apache, MySQL and PHP and interestingly he does it by compiling from source. And in the last part, he plows into configuring apache webserver.

Jumat, 24 Februari 2006

Password protect your website hosted on Apache web server

At times, when I am browsing the web, I click on a link such as this one and instead of a web page, I get a dialog box asking me to enter my user name and password. And only after I have been authenticated do I get access to the website (or page). This feature of password protection is very simple to implement in Apache web server.

Basically, the whole process of password authentication banks on just two files . Them being :
  1. .htpasswd - This file contains the user name - password combination of the users who are allowed access to the website or page. This file can reside anywhere other than the directory (or path) of your website. But usually, it is created in the Apache web server directory (/etc/apache2/.htpasswd). This is because, this file should not be accessible to the visitors to the site.
  2. .htaccess - This file defines the actual rules based on which users are given access or denied access to a particular section or whole of the website. This file should reside in the base directory of one's website. For example, if my website is located in the path '/var/www/mysite.com' and I want to provide user authentication to the entire website, then I will store the file .htaccess in the following location - '/var/www/mysite.com/.htaccess '.
If one is implementing this feature for the first time on one's server, then he has to create the .htpasswd file. I chose to create the .htpasswd file in the apache 2 configuration directory. After this, one can add any number of users and assign passwords to them. This is done by the htpasswd utility which gets installed with the apache2 web server.
# htpasswd -c /etc/apache2/.htpasswd ravi
New password: *****
Re-type new password: *****
Adding password for user ravi
#_
In the above command, -c option asks the htpasswd utility to first create a .htpasswd file in the /etc/apache2 directory. Simultaneously, I have provided the name of the user (myself) and the utility asks me to type a password which is used to authenticate me before allowing access to the site.

Note: Any number of users and their password may be entered in the same .htpasswd file per website.

Now I make this .htpasswd file readable by all the users as follows:
# chmod 644 /etc/apache2/.htpasswd
Next step is the creation of the file .htaccess which will prohibit the full or a part of the website which is situated in /var/www/mysite.com. Since I am interested in password protecting the whole website, I create the file in the /var/www/mysite.com base directory. But if I am interested in protecting only a sub-directory (say by name 'personal') of this site, then I will have to create it in the '/var/www/mysite.com/personal' directory.
# touch /var/www/mysite.com/.htaccess
Now I enter the following lines in the .htaccess file :
AuthUserFile  /etc/apache2/.htpasswd
AuthGroupFile /dev/null
AuthName MySiteWeb
AuthType Basic
require user ravi
Here 'AuthUserFile' points to the place where I have stored the .htpasswd flat file which contains the user names and passwords.
AuthGroupFile points to the group file which contains the group of users. Here I have opted to not have a group file and hence points it to /dev/null .
AuthName directive sets the name of the authorization realm for this directory. This name can contain spaces.This is a name given to users so they know which username and password to send.
AuthType value of Basic instructs apache to accept basic unencrypted passwords from the remote user's web browser.
The last line - require user ravi - tells apache that only the user with name 'ravi' should be allowed access provided the right password is entered. If more than one user is to be allowed access, then those user names could also be appended to the line. Suppose I want another user also to access the file, I modify the line as follows:
require user ravi john
And if I want all the users listed in the .htpasswd file to be allowed access, the line is modified as thus:
require valid-user
The .htaccess file also has to be provided the right file permissions.
# chmod 644 /var/www/mysite.com/.htaccess
One more step is needed; that is to change a line in the apache2 configuration file. In a previous article titled "Host websites on your local machine using Apache websever", I had dwelled upon the modular structure of the Apache 2 configuration files.

Following that structure, assuming my configuration file for the website /var/www/mysite.com is stored in /etc/apache2/sites-available/mysite.com , I open the file in an editor and change the following line :
<Directory /var/www/mysite.com/>
...
AllowOverride None
...
</Directory>
TO
<Directory /var/www/mysite.com/>
...
AllowOverride AuthConfig
...
</Directory>
... and save and exit the file. Now restart apache web server to re-read the configuration file.

Note: If you are using apache instead of apache2, then the file to be edited is /etc/httpd/conf/httpd.conf though the lines to be edited are the same.

That is it. From now on any user who visits the website will first have to enter the correct username and password before he is allowed access to the website.

Rabu, 15 Februari 2006

Host websites on your local machine using Apache websever

Apache is a popular web server which has grabbed a major slice of the web server market. What is interesting about Apache is its stability and scalability which makes it possible to serve even very high traffic web sites without any hitch. It also helps that it comes with an unbeatable price (free). It is bundled by default with most Linux distributions. And in cases where it is not included in the CD, it is a simple case of downloading the package and installing it.

Here I will explain how one can set up Apache web server to serve ones web pages from your machine.

Packages to be installed
apache2 , apache2-common , apache2-mpm-prefork
And optionally ...
apache2-utils , php4 (If you need PHP support) , php4-common

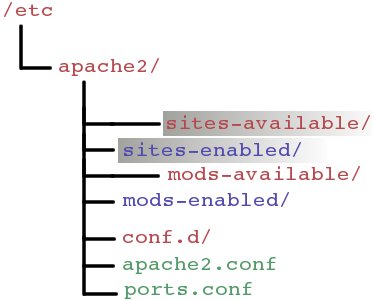
Apache2 has a very modular structure. In fact if you see the directory structure of the configuration files (see figure below), you will realise that it is designed to avoid clutter. For serving web pages on our machine, we need be concerned with just two directories - them being, /etc/apache2/sites-available/ and /etc/apache2/sites-enabled/ .

Fig: Apache2 directory structure

In the sites-available directory you create the files (can be any name) containing the configuration details of the sites you aim to host - one file per site. And in the sites-enabled directory, you create a soft link to the previously created file.

Configuration details
Let us assume for the sake of this tutorial that I have decided to host two websites on my local machine. All the files related to the two websites have already been created and saved in two separate directories by name websiteA and websiteB . The default location for serving the files in apache is usually in the /var/www location. So I move the two directories websiteA and websiteB to this location.
$ sudo cp -R -p websiteA /var/www/.
$ sudo cp -R -p websiteB /var/www/.
The -p option preserves the ownership of the files and directories while copying.

Next I move into the directory /etc/apache2/sites-available in order to configure apache web server to recognize my sites. In this directory, there is a file called default which contains the configuration parameters. It is meant to be a skeleton file which can be used as a base for additional configuration.

I made two copies of this file in the same directory and renamed them as websiteA and websiteB. You can give any name really but for clarity it is prudent to give them the name of your site.

Now I opened up the file /etc/apache2/sites-available/websiteA in my favourite editor (vi) and made changes to the following portions (shown in bold):
#FILE: /etc/apache2/sites-available/websiteA
NameVirtualHost websiteA:80

<virtualhost websiteA:80>
ServerAdmin ravi@localhost
ServerName websiteA
DocumentRoot /var/www/websiteA/
<directory>
Options FollowSymLinks
AllowOverride None
</directory>
<directory /var/www/websiteA/>
Options Indexes FollowSymLinks MultiViews
AllowOverride None
Order allow,deny
allow from all
...
</directory>
...
...
</virtualhost>
In the above listing, ServerName indicates the name (or alias) with which your site has to be recognised. Usually a webserver will be hosting multiple sites with different domain names on the same machine. At such times, the webserver distinguishes between different websites through the ServerName directive. Since this is a local machine, I have given it the name websiteA. But in actual hosting where you want to make the website available on the net, you will be giving it your domain name say like www.mysite.com or something.
The DocumentRoot option denotes which files to be served when the server name is entered in the web browser. This usually points to the place where you have stored your website files.
You can have multiple Directory tags but one of them should point to the location of the website files.
I made similar changes to the file websiteB where the ServerName was given a unique name websiteB instead of websiteA as given above. Also the Directory tag contained the path /var/www/websiteB/ instead of websiteA.

Finally, because I was hosting this on my local machine and since I had not configured DNS, I had to edit the /etc/hosts file and include the name given in the ServerName portion of the configuration file. After the inclusion, my machine's /etc/hosts file looked as follows:
#FILE : /etc/hosts
127.0.0.1 localhost.localdomain localhost websiteA websiteB
That was it. Now in order to enable the websites, all I had to do was create a symbolic link to these files in the /etc/apache2/sites-enabled/ directory and restart the web server. It is quite clear that to disable a website, all you need to do is remove the symlink in the sites-enabled directory.
$ cd /etc/apache2/sites-enabled
$ sudo ln -s /etc/apache2/sites-available/websiteA .
$ sudo ln -s /etc/apache2/sites-available/websiteB .
Restart the apache web server
$ sudo apache2ctl restart
OR
$ sudo /etc/init.d/apache2 restart
Now I tested it by opening up the web browser and typing http://websiteA to get the first website and http://websiteB to get the second website. Voila! Success!!.

Note: In previous versions of Apache, all these configuration parameters were inserted in the /etc/httpd/httpd.conf file. But I feel, apache2's configuration file layout is much more intutive and easier to manage.

Jumat, 09 September 2005

Apache : Name-based Vs IP Based Virtual Hosting

Often when, you attend interviews for network administration related jobs , the one question you may encounter while discussing about web servers is the difference between name-based and IP based virtual hosting. Here I will explain the difference between the two.

In IP-based virtual hosting, you are running more than one web site on the same server machine, but each web site has its own IP address. In order to do this, you have to first tell your operating system about the multiple IP addresses. See my post on configuring multiple IP addresses on a single NIC . You also need to put each IP in your DNS, so that it will resolve to the names that you want to give those addresses .

In Name-based virtual hosting, you host multiple websites on the same IP address. But for this to succeed, you have to put more than one DNS record for your IP address in the DNS database. This is done using CNAME tag in BIND. You can have as many CNAME(s) as you like pointing to a particular machine. Of course, you also have to uncomment the NameVirtualHost section in httpd.conf file and point it to the IP address of your machine.

#FILE: httpd.conf
...
NameVirtualHost 192.168.0.1
...

This excellent article on Serverwatch.com explains in detail the configuration details of both types of virtual hosting in apache webserver.

Selasa, 05 April 2005

Configuring Apache webserver to restrict access to your website

Apache Webserver is the most popular web server and has a market share of around 60%. Here I will explain a small but very useful feature of the apache web server - which is restricting access to (a part of) your website to only the privileged few by implementing username and passwords.
There are two ways of restricting access to documents.
  1. Either by the hostname of the browser being used
  2. By asking a username and password
The first method can be used to, for example, restricting documents being used within a company. But if the people who are accessing documents are widely dispersed, then the second method is more suitable.
Here I will explain the second method - ie, assigning username and passwords to users who are authorized to access the documents. This is known as user authentication.
Setting up user authentication takes two steps :
  1. Create a file containing username and passwords - Apache webserver has a utility called htpasswd to create the file containing username and passwords. Here I am creating a file called 'users' in the /usr/local/etc/ directory.
Note: For security reasons, the above file should NOT be under the document root. It can be anywhere BUT the document root.
The first time you run the htpasswd utility, you run it using the -c flag as follows:
# htpasswd -c /usr/local/etc/users gopinath
The -c argument tells htpasswd to create a new users file. When you run the above command, you will be prompted to enter a password for the user gopinath, and confirm it by entering it again. Other users can be added to the existing file in the same way, except that the -c argument is not needed. The same command can also be used to modify the password of an existing user.
After adding a few users, the /usr/local/etc/users file might look like this :
gopinath:WrU90BHQai36
kumar:iABSd12QWs67
ankit:Wer56HsD12s6
The first field is the username and the second field is the encrypted password.
Now comes the Apache server's configuration part. Open the apache server's configuration file /etc/httpd/conf/httpd.conf (your configuration file will be in different location depending on the distribution you are using) and look for the line :
AllowOverride None 
And change it to
AllowOverride AuthConfig
If you want to protect the document root itself, create a file '.htaccess' in the top directory path and include the following lines to it:
#File: .htaccess
AuthName "Only Valid Access"
AuthType Basic
AuthUserFile /usr/local/etc/users
require valid-user
AuthName - directive specifies a realm name for this protection. Once a user has entered a valid username and password, any other resource within the same realm name can be accessed with the same username and password.
AuthType - directive tells the server what protocol is to be used for authentication. At the moment, 'Basic' is the only method available. However, a new method, 'Digest' is about to be standardized, and once browsers start to implement it, Digest authentication will provide more security than Basic authentication.
AuthUserFile - tells the server the location of the user file created by htpasswd utility. A similar directive, AuthGroupFile, can be used to tell the server the location of a group's file.

Lastly don't forget to restart the web server which rereads the changed configuration files :
# service httpd restart
From here on when you try to access your protected site or the directory via the web browser, you will be asked for authentication first. And only those users whose name has been entered in the file pointed to by the AuthUserFile directive will be allowed access to your site.