Rabu, 21 September 2005

Locating files using the find command

Find is a versatile tool which can be used to locate files and directories satisfying different user criteria. But the sheer number of options for this command line tool makes it at the same time both powerful and encumbering for the user. Here I will list a few combinations which one can use to get useful results using find command.

Find all HTML files starting with letter 'a' in your current directory (Case sensitive)
$ find . -name a\*.html

Same as above but case insensitive search.
$ find . -iname a\*.html

Find files which are larger than 5 MB in size.
$ find . -size +5000k -type f

Here the '+' in '+5000k' indicates greater than and k is kilobytes. And the dot '.' indicates the current directory. The -type option can take any of the following values:

f - file
d - directory
l - symbolic link
c - character
p - named pipe (FIFO)
s - socket
b - block device
Find all empty files in your directory
$ find . -size 0c -type f

... Which is all files with 0 bytes size. The option -size can take the following:

c - bytes
w - 2 byte words
k - kilo bytes
b - 512 byte blocks

Note: The above command can also take the -empty parameter.

Find is very powerful in that you can combine it with other commands. For example, to find all empty files in the current directory and delete them, do the following:
$ find . -empty -maxdepth 1 -exec rm {} \;

To search for a html file having the text 'Web sites' in it, you can combine find with grep as follows:
$ find . -type f -iname \*.html -exec grep -s "Web sites" {} \;

... the -s option in grep suppresses errors about non-existent or unreadable files. And {} is a placeholder for the files found. The semicolon ';' is escaped using backslash so as not to be interpreted by bash shell.

Note: You can use the -exec option to combine any command in Linux with the find command. Some of the useful things you can do with it are as follows:

Compress log files on an individual basis
$ find /var -iname \*.log -exec bzip {} \;

Find all files which belong to user lal and change its ownership to ravi
# find / -user lal -exec chown ravi {} \;

Note: You can also use xargs command instead of the -exec option as follows:
$ find /var -iname \*.log | xargs bzip -

Find all files which do not belong to any user:
$ find . -nouser

Find files which have permissions rwx for user and rw for group and others :
$ find . -perm 766

... and then list them.

$ find . -perm 766 -exec ls -l {} \;

Find all directories with name music_files
$ find . -type d -iname \*music_files\*

Suppose you want to find files of size between 700k and 1000k, do the following:
$ find . \( -size +700k -and -size -1000k \)

And how about getting a formatted output of the above command with the size of each file listed ?
$ find . \( -size +700k -and -size -1000k \) -exec du -Hs {} \; 2>/dev/null

... here, the '2>/dev/null' means all the error messages are discarded or suppressed.

You can also limit your search by file system type. For example, to restrict search to files residing only in the NTFS and VFAT filesystem, do the following:
$ find / -maxdepth 2 \( -fstype vfat -or -fstype ntfs \) 2> /dev/null

These are the most common uses of the find command. You can see additional uses by reading the find manual.

Minggu, 18 September 2005

Routing , NAT and Gateways in Linux

A router is a device that directs network traffic destined for an entirely different network in the right direction. For example, suppose your network is having the IP address range of 192.168.1.0/16 and you also have a different network which has a network addresses in range 192.168.2.0/16 . Note that these are 'Class C' network addresses which are subnetted. So for your computer ( on the network 192.168.1.0/16 ) to directly communicate between a computer in the network 192.168.2.0/16, you need a intermediary to direct the traffic to the destination network. This is achieved by a router.

Configuring Linux as a router

Linux can be effectively configured to act as a router between two networks. To activate routing functionality , you enable IP forwarding in Linux. This is how you do this:

# echo "1" > /proc/sys/net/ipv4/ip_forward

Now you have enabled IP forwarding in Linux. Now make this change persistent across reboots by editing the file /etc/sysctl.conf and entering the following line:

#FILE : /etc/sysctl.conf
...
net.ipv4.ip_forward = 1
...

Optionally, after editing the above file, you may execute the command :

# sysctl -p

Note: For your linux machine to act as a router, you need two ethernet cards in your machine or you can also configure a single ethernet card to have multiple IP addresses.

What is a gateway?
Any device which acts as the path to or from your network to another network or the internet is considered to be a gateway. Let me explain this with an example: Suppose your computer, machine_B has an address 192.168.0.5 with default netmask. And another computer (machine_A) with an IP address 192.168.0.1 in your network is connected to the internet using a USB cable modem. Now if you want machine_B to send or recieve data destined for an outside network a.k.a internet, it has to direct it to machine_A first which forwards it to the internet. So machine_A acts as the gateway to the internet. Each machine needs a default gateway to reach machines outside the local network. You can set the gateway in machine_B to point to machine_A as follows:

# route add default gw machine_A

Or if DNS is not configured...

# route add default gw 192.168.0.1

Now you can check if the default gateway is set on machine_B as follows:

# route -n

As you can see in the image above, the machine_B has the default gateway set to 192.168.0.1 . And the default gateway has the flag set as UG - 'G' means Gateway and 'U' means the network is UP.

Note: Additional routes can be set using route command. To make the changes persistent across reboots, you may edit the /etc/sysconfig/static-routes file to show the configured route.

What is NAT ?
Network Address Translation (NAT) is a capability of linux kernel where the source or destination address / port of the packet is altered while in transit.
This is used in situations where multiple machines need to access the internet with only one official IP address available. A common name for this is IP masquerading. With masquerading, your router acts as a OSI layer 3 or layer 4 proxy. In this case, Linux keeps track of the packet(s) journey so that during transmission and recipt of data, the content of the session remains intact. You can easily implement NAT on your gateway machine or router by using Iptables, which I will explain in another post.

Related Posts :
How to install network card in Linux
How to assign an IP address
Setting up multiple IP addresses on a single NIC

Kamis, 15 September 2005

How to setup SSH keys and why?

Secure SHell (SSH) as the name indicates is a secure form of connecting to a remote machine. It is secure because all data transfer via SSH happens in encrypted form. SSH comes with a collection of tools. For instance, you have -
  • scp - which is used to copy files between remote machines securely.
  • sftp - Which is secure FTP , file transfer.
  • And of course SSH's more common duty being to let users login securely to a remote machine.
SSH comes in two versions. ie SSH 1 and SSH 2. The more recent SSH 2 is provided by a package called OpenSSH. I am going to use SSH 2 here. So make sure you have OpenSSH package installed on your machine.
SSH makes use of public and private keys to verify who you are. And the keys are generated using either RSA or DSA algorithms. Of course , you can also ssh to a remote machine without going through the trouble of creating public and private keys, but it will be less secure.

Figure: Asks for password when ssh(ing) without public and private keys.

Creation of SSH public and private key
To create an SSH key, you make use of the ssh-keygen program as follows:

$ ssh-keygen -t rsa -b 1024

Now it will ask a few details and finally ask to enter a secret pass phrase. After you have entered the pass phrase, it will generate two keys. A public key by name 'id_rsa.pub' and a private key by name 'id_rsa'. And these keys will be stored in a hidden directory called .ssh in your home folder.

Figure: Creating the public private key pair.

Next you have to copy the just created public portion of your key to the remote machine. Let us assume that your local machine is local_mc and the remote machine to which you want to SSH to is remote_mc . You can use scp to copy the key to the remote machine as follows:

$ scp ~/.ssh/id_rsa.pub remote_mc:.ssh/authorized_keys

Above, I have copied the id_rsa.pub key to the .ssh folder of the remote machine and named it authorized_keys. Now remote_mc is ready to accept your ssh connection.

Note: Usually you are not the administrator of the remote machine. In which case, you have to email your public key to the administrator of remote_mc. And he will first check if the key is valid by entering the command :

# ssh-keygen -l -f the_key_you_send.pub

And once he is satisfied, he will include the key into the .ssh directory of the user's account on remote_mc.Now when you want to login to remote_mc via ssh, it will ask you for the pass phrase.
Note: This is significant because you are transmitting your encrypted pass phrase and NOT the password across the network. And the finger print you generated on local_mc is tied not only to the user account on your local machine but also to the machine itself.

Figure: Asks for the pass phrase instead of password.

Which means, you can log in to the remote_mc only from the local_mc using that public key and not from any other machine on the network.

Password-less logins using SSH
All this is fine; But what happens when you have to ssh to the remote_mc frequently. It becomes tedious and error prone to type the pass phrase each and every time. There is a way for you to circumvent this issue.
You can use a tool called ssh-agent. So when you try to ssh to remote_mc from the local_mc, the ssh agent will verify that this key does come from you. It is ssh agent's responsibility to handle the key. So now you need only give the pass phrase the first time you log on to the remote_mc . And the next time you log in, the ssh agent verifies your identity and you are automatically logged on to the remote_mc.
These are the steps required for password less logins.
  • Start ssh-agent in the command line.
    $ exec ssh-agent /bin/bash
    $_

  • Add your identity to the ssh-agent using the ssh-add tool.

    $ ssh-add ~/.ssh/id_rsa
When you enter the above command, it will ask for your pass phrase which you have to provide. From here on,the ssh-agent will verify your identity and you can ssh to the remote machine without entering the pass phrase.

Figure: Using ssh-add to add your identity to the ssh agent.

$ ssh -l skinner remote_mc

From now on you don't have to use the password or pass phrase to ssh to the remote_mc machine.
Also Read:
My previous post on Secure SHell.

Prohibiting users from shutting down or rebooting the machine

If you are allowing the general public, access to your computers (Like for example, in a cyber cafe), then you will be interested in restricting the users from shutting down or rebooting your Linux machine. The following are the steps needed to accomplish this:

Disable access through the Action Menu (Applicable to GNOME desktop)
Run the gconf-editor program on the GNOME desktop,

# gconf-editor

and check off the entry for /apps/gnome-session/options/logout_prompt.

Disable shutdown and reboot commands at the login screen
The gdm daemon is responsible for managing the login screen in X. Edit the /etc/X11/gdm/gdm.conf file, and set the 'SystemMenu' directive to 'false'.

Note: The gdm.conf file is a liberally commented file which contains a lot of configuration parameters which can be changed to modify how the system logs in for an X session. For example if you want the system to log in automatically to a users account after an interval of logout period then you set the 'TimedLoginEnable' parameter to true.

Prevent users from executing these commands in the console
Rename the reboot, poweroff, and halt files under the /etc/security/console.apps/ directory.
And finally ...

Disable the Ctrl+Alt+Del key combination
Comment out the following line in the /etc/inittab file:

# FILE: /etc/inittab
# ca::ctrlaltdel:/sbin/shutdown -t3 -r now

This will disable the Ctrl+Alt+Del key sequence . Now only root can power off or reboot the machine.

Also read:
Give selective superuser powers to users.

Selasa, 13 September 2005

How to change MAC address

Changing MAC address of a machine is called spoofing a MAC address or faking a MAC address. In linux, you can change MAC address of your machine.This is how it is done.

How to change MAC address in Linux


First find the physical MAC address of your machine by running the following command :
$ ifconfig -a | grep HWaddr
eth0 Link encap:Ethernet HWaddr 00:80:48:BA:d1:20

The hexadecimal numbers in blue denote my machine's MAC address. Yours will be different. Learn how to use the ifconfig Linux command.

Next, login as root in Linux and enter the following commands -

# ifconfig eth0 down
# ifconfig eth0 hw ether 00:80:48:BA:d1:30
# ifconfig eth0 up
# ifconfig eth0 |grep HWaddr

Note above that I have changed the MAC address to a different number highlighted in blue. 00:80:48:BA:d1:30 is the new MAC address I have provided for my Linux machine. You can choose any 48 bits hexadecimal address as your MAC address.

Why you should change MAC address of your Linux machine


These are the reasons you should change the MAC address of your machine.
  • For privacy  - For instance when you are connecting to a Wi-Fi hotspot.
  • To ensure interoperability. Some internet service providers bind their service to a specific MAC address; if the user then changes their network card or intends to install a router, the service won't work anymore. Changing the MAC address of the new interface will solve the problem.

Caveats to Changing MAC address


In Linux, Windows, Mac OS X, or a different operating system, changing MAC address is only temporary. Once you reboot your machine, the operating system reflects the physical MAC address burnt in your network card and not the MAC address you set.

Bash Completion - Makes life easier for Linux users

One thing that really makes working in the command line in Linux a pleasure is the various in-built shortcuts and name completion features in Bash - the default shell in Linux.

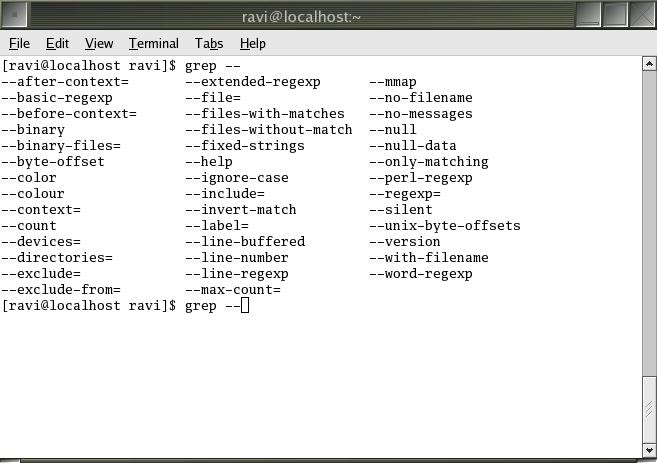
But one grouse I always had was it was really difficult to remember all the options that each command had. For example, 'find' came with numerous options which I found difficult to memorize and had to resort to reading the man page each time I had to use the command. Now you can enhance the bash shell to give you the added functionality of listing the options that can be used with a command. For that you should download and install an add-on package called bash-completion. I use Fedora Core 2 but if you are using the latest Linux distribution, it might be installed by default on your machine.
In Debian based Linux distributions, you may install it using the following command :
# apt-get install bash-completion
After installing the bash-completion package, fire up a terminal and type:

$ grep --

... followed by two TABs and you get all the options that can be passed to the grep command (see figure). This works for any command in linux. Now you don't have to remember all those options that need be passed to the programs any longer.

bash completion
Also read:
Bash Shell Shortcuts
Special Shell Variables

Jumat, 09 September 2005

Apache : Name-based Vs IP Based Virtual Hosting

Often when, you attend interviews for network administration related jobs , the one question you may encounter while discussing about web servers is the difference between name-based and IP based virtual hosting. Here I will explain the difference between the two.

In IP-based virtual hosting, you are running more than one web site on the same server machine, but each web site has its own IP address. In order to do this, you have to first tell your operating system about the multiple IP addresses. See my post on configuring multiple IP addresses on a single NIC . You also need to put each IP in your DNS, so that it will resolve to the names that you want to give those addresses .

In Name-based virtual hosting, you host multiple websites on the same IP address. But for this to succeed, you have to put more than one DNS record for your IP address in the DNS database. This is done using CNAME tag in BIND. You can have as many CNAME(s) as you like pointing to a particular machine. Of course, you also have to uncomment the NameVirtualHost section in httpd.conf file and point it to the IP address of your machine.

#FILE: httpd.conf
...
NameVirtualHost 192.168.0.1
...

This excellent article on Serverwatch.com explains in detail the configuration details of both types of virtual hosting in apache webserver.